上架時,遇到一個問題:若是想讓自己的 App 避開某些機子,如『不適合在 3gs 或其規格以下的機子執行』,該怎麼辦呢?
這裡提供了一個方法,搭配 Apple 所訂的 Device Compatibility Matrix,就能用規格來卡位。
例如:『不適合在 3gs 執行』這個條件,就根據 Matrix 來找出 3gs 不支援的功能,像是 "front-facing-camera" or "gyroscope" 都可以,把它設定到你的 App Plist 的 "required device capabilities",將來就可以在你的 iTunes App 黃頁,巨大 Icon 的下方,看到 3gs 沒有被列入了!
參考文件: App related resources.
2012年7月23日 星期一
2012年5月31日 星期四
XCode 4.3 Extended Modules
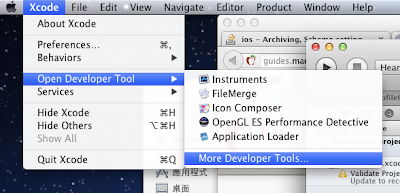
從開發環境 XCode 4.2 migrate to XCode 4.3 以後,原本可以 compile 的程式碼出現問題:"CADebugMacros.h" 找不到。
原來這是以前放在 /Developer/Extras/CoreAudio/PublicUtility/** 下面的 header file. 隨著 XCode 4.3 推出,/Developer/** 目錄已經不復存在,一些 Cocoa FrameWork相關的模組內定為不安裝,必須請開發者自己搞定(Apple 內心獨白:呵呵,要付錢才給你用!)
解決這類問題,首先由 XCode 4.3 選單連到 Apple developer 網站:
當然,這時出現登入 iOS developer 的畫面,有繳保護費才能繼續玩喔!
登入後,看到 Extended modules:

下載後,可以自行指定要安裝在那兒,以我自己的環境為例, 整包 CoreAudio 目錄安裝於 /Users/tom/Documents/XCodeExtraLibrary/CoreAudio/* :

如上圖,在 XCode 的 Targets -> Build Settings 標籤內,輸入安裝的路徑,就可以解決問題!
原來這是以前放在 /Developer/Extras/CoreAudio/PublicUtility/** 下面的 header file. 隨著 XCode 4.3 推出,/Developer/** 目錄已經不復存在,一些 Cocoa FrameWork相關的模組內定為不安裝,必須請開發者自己搞定(Apple 內心獨白:呵呵,要付錢才給你用!)
解決這類問題,首先由 XCode 4.3 選單連到 Apple developer 網站:

當然,這時出現登入 iOS developer 的畫面,
登入後,看到 Extended modules:

下載後,可以自行指定要安裝在那兒,以我自己的環境為例, 整包 CoreAudio 目錄安裝於 /Users/tom/Documents/XCodeExtraLibrary/CoreAudio/* :

如上圖,在 XCode 的 Targets -> Build Settings 標籤內,輸入安裝的路徑,就可以解決問題!
Private Method in Objective-C
Objective-C 的呼叫是 message passing 方式,只要有 implement method 可以呼叫,就會成功。這種情形下,沒有像 C++ 的 private method,只能靠 Compiler 警告.
實作方法
這裡
Now in 2013 things changed:
Apple 提供的 IDE : XCode 4.5 支援 objective-C 2.0 (大概是這個版本) catetgory,可以提供私有 iVars 與 methods 的宣告了!
Now in 2013 things changed:
Apple 提供的 IDE : XCode 4.5 支援 objective-C 2.0 (大概是這個版本) catetgory,可以提供私有 iVars 與 methods 的宣告了!
2012年4月17日 星期二
iOS project 添加 Three20 支援 (XCode >= 4.0)
Three20 Screencast 指令節錄 網址: http://www.youtube.com/watch?v=-0-E-Z0fihg
Clone project:
git clone git://github.com/facebook/three20.git
Create your own project e.g. TestThree20, paralleled to the git downloads, then you have directories like this:
Documents
    |
    three20
    |
    TestThree20
Then, use one python scrip to automatically import three20 to your project:
python three20/src/scripts/ttmodule.py -p \
 TestThree20/TestThree20.xcodeproj Three20 --xcode-version=4
Now, open your project in XCode, all things were done.
2012年4月1日 星期日
How to create project with Cocos2d and ARC support
Reference from this site :
Tiny tim
Often we want to write our APP under iOS5 with ARC support. But the developers of Cocos2d are still working for transfering the framework to the ARC.
How should we do ? Disable ARC for all Cocos2d files one by one ? Tiny tim has proposed a cleaner way --- managed by sub-project. Here it is :
1. Get cocos2d sources:
Go to https://github.com/cocos2d/cocos2d-iphone
git://github.com/cocos2d/cocos2d-iphone.git
2. Checkout the gles20 branch
git checkout gles20
3. Creating your own project with ARC enabled, by default, it is enabled by the XCode4 templates.

4. Drag and drop cocos2d-ios.xcodeproj to your project, and link cocos2d as a static library to your project.

5. Configure the user header search for YOUR PROJECT (not cocos2d-ios).

6. Configure the recursive searches.

7. Build the project. Note : If you exam "Build settings" of your project , the setting of "Objective-C Automatic Reference Counting" is "Yes". In cocos2d-ios sub-project, the same setting is "No".
2011年12月20日 星期二
Gestures and View Transform
To use the UIGestureRecognizer for pinch and rotate gesture,
we first create it:
The following paragraph uses another approach for the rotation:
we first create it:
  // Create a rotation gesture

  UIRotationGestureRecognizer *rotate = [[UIRotationGestureRecognizer alloc]

  initWithTarget:self

  action:@selector(handleRotateEvent:)];

  [rotate setDelegate:self];

  [redBox addGestureRecognizer:rotate];
Then write the handleRotateEvent: method:
// Called when the rotate gesture is recognized

- (void)handleRotateEvent:(UIRotationGestureRecognizer*)rotateGesture

{

    // If our gesture ended, reset the box

    if([rotateGesture state] == UIGestureRecognizerStateEnded) {

    [self resetBox];

  }

  else {

    // Store the value of our rotation gesture, then

    // call our central update box tranform method

    // Update box transform will also apply any transforms by the pinch gesture

    rotation = rotateGesture.rotation;

    [self updateBoxTransform];

  }

}
In the updateBoxTransform, we directly use the rotation value to view’s transform:
- (void)updateBoxTransform

{

    // Create a new transform based on the scale (scale determined by pinch gesture)

    CGAffineTransform transform = CGAffineTransformMakeScale(scale, scale);


    // Rotate the transform based on the rotation gesture value

    transform = CGAffineTransformRotate(transform, rotation);

    //-- contineously using the gesture's rotation


    // Apply the transform to our red box

    redBox.transform = transform;

}
Here we initialize a transform with Identity and scale, each time.The following paragraph uses another approach for the rotation:
- (void)handleRotateEvent:(UIRotationGestureRecognizer *)gestureRecognizer

{

  [self adjustAnchorPointForGestureRecognizer:gestureRecognizer];

  if ([gestureRecognizer state] == UIGestureRecognizerStateBegan ||

      [gestureRecognizer state] == UIGestureRecognizerStateChanged) {

    [gestureRecognizer view].transform =

      CGAffineTransformRotate( [ [gestureRecognizer view] transform],
                               [gestureRecognize rotation] );

    [gestureRecognizer setRotation:0]; //-- reset gesture's rotation

  }

}
Since the source of transform is from the view object, we have to [gestureRecognizer setRotation:0]; such that we provide a fresh rotation quantum and add to the view’s transform
2011年11月25日 星期五
Discussions about using "Singleton" and "Archiving/Unarchiving"
This is a practical situation encountered --- We want a "Singleton" object which has the ability of "Archiving/Unarchiving", should we implement these two design patterns together? There is a discussion in Stack Overflow.
My thoughts : Maybe it is unnecessary to implement them in the same class, as "wbyoung" said, two lines of code do the same work.
My thoughts : Maybe it is unnecessary to implement them in the same class, as "wbyoung" said, two lines of code do the same work.
2011年8月8日 星期一
deleting trailing whitespace
When using git to maintain versions of XCode4 projects, often we need to "delete trailing whitespace" before we add or commit file to the git tree. While XCode4 leaves lots of line with trailing white spaces. How to remove them?
By Bash commands :
find -E . -type f -regex ".*\.(h|m|mm)" -print0 | xargs -0 sed -i -E "s/[[:space:]]*$//"
Note:
-E for find: Interpret pattern after -regex with Extended Regular Expression(ERE) syntax, should be placed before {directory}
".*\.(h|m|mm)" : match file name with .h, .m, .mm at the end, which is ERE syntax.
-E for sed: Interpret pattern using ERE syntax, the [:sapce:] represents the Whitespace character set: [ \t\r\n\v\f]
Thus, we can delete trailing white space with one command line in the project top directory ! Simple and clear !
2011年7月19日 星期二
The COSCUP 2011 iPhone program
緣由: 今年 COSCUP,由於智慧型手機的普遍化,增添了 App 競賽。所以就來共襄盛舉一番。
6 月 20 日:看到 COSCUP 的公告,開始熱血沸騰...可是,我不會 Java 、剛學會 Objective-C,只會寫 Hello World;如果要選比較可能做得到的平台,好像 iPhone 比較接近一些些。所以開始研讀 Cocoa 。
7 月 9 日,可以用 COSCUP API 抓到資料,用 json framework 來 parsing,感覺很幸福!
7 月 10, 11 ... 15 日,頭髮一直掉.... 媽!我錯了!但是為了自我實現的一個目標,繼續奮戰。感謝家人,同事的默默支持,也感謝 COSCUP 工作人員的協助。
這是現在完成的三個畫面。
以時間來看

以議程的類型來看

這兩種觀看的模式,可用右上角的按鈕群來互相切換。
另外,贊助廠商的導覽,可以由畫面下方的 Sponsors tab 來選擇。

因為這是一些資料的 parsing ,目的是使大家很快的找到需要的資訊,所以以極簡風格來完成使命。
第一次執行時,會從 COSCUP 網站下載資訊,之後就存在手機裡了,之後就從手機讀檔,需要 update 的話,左上角按鈕可以再從網站下載。
另外,有提供智慧型的語系選擇,例如,如果從 COSCUP 拿到了 Intel 廠商給的資訊,只有中文,那麼不論手機的語系設定如何,都會看到中文;那如果贊助廠商給的資訊有中、英文,那就會優先以手機的語系設定來顯示出贊助廠商的資訊。
程式碼放在 GitHub
git clone: git@github.com:tomjpsun/Coscup.git
就這樣啦!期待大家在8/20 見面啦!
訂閱:
文章 (Atom)